Truck Leaks: Third Brake Lights
Truck Third Brake Light Water Leak: The Hidden Culprit Destroying Your Interior
If you've noticed a musty smell, a damp headliner, or mysterious puddles in the back of your truck cab — and you've already ruled out the doors and windows — it's time to look up. Specifically, at your third brake light. This small, easy-to-overlook component is one of the most common causes of truck cab water leaks, and the damage it causes is anything but small.
At Car Mold Guys, we remediate vehicle mold for a living, and you'd be surprised how often we trace a full-blown mold infestation back to something as innocuous as a failed third brake light seal. This guide walks you through exactly how the leak happens, how to confirm it's the source, how to fix it, and — critically — what to do if moisture has already worked its way inside and mold has started to grow. It's one of several common vehicle water-leak sources we see week in and week out.
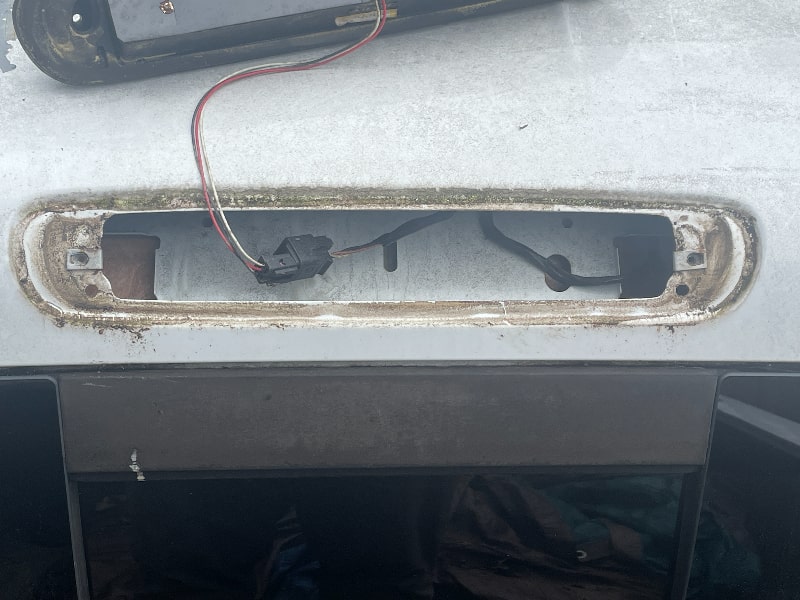
What Is the Third Brake Light — and Why Does It Leak?
The third brake light (also called the CHMSL, or Center High-Mounted Stop Lamp) is the brake light mounted high on the rear of your cab, usually centered above the rear window. It's a federally mandated safety feature — required on passenger cars since 1986 and on most trucks and SUVs since the mid-1990s. You can read more about these requirements through the NHTSA's vehicle safety standards.
Because it sits at the very top of the cab and takes the full force of rain, car washes, and temperature swings, the light depends on a rubber gasket or foam seal to keep water out. When that seal fails — and it will, eventually, on nearly every truck — water gets a direct pathway into the headliner, down the rear pillars, and onto the cab floor.
Why the seal eventually fails
Age & UV degradation: Rubber dries out, cracks, and shrinks over time. Georgia summers alone accelerate this; once the gasket loses flexibility, it can't compress and seal.
Improper installation: If the light was ever removed and reinstalled, a misseated gasket or overtightened screws create pressure points that break the seal.
Physical damage: A cracked lens, damaged housing, or minor impact opens a path water will find every time it rains.
Design vulnerabilities: Some trucks have mounting channels that let water pool right around the assembly. Certain Ford F-150s, Chevy Silverados, Ram 1500s, and Toyota Tacomas are especially prone to it.
Warning Signs Your Third Brake Light Is Leaking
Catching these early is the difference between a one-hour reseal and a full interior remediation:
|
Musty, earthy odor Especially noticeable on rainy days or when the heat first kicks on. |
Stained or damp headliner A yellow, brown, or gray spot in the center-rear, spreading from the mount. |
|
Wet rear carpet or seats Dampness behind the rear seats where water runs down the D-pillars. |
Drips after rain or a wash Visible water dripping from the light or pooling inside the cab. |
How to Confirm the Third Brake Light Is the Source
A cab leak can come from several places — doors, windshield, antenna base, rear-window seal — so confirm the third brake light before you tear anything apart:
- Run the garden-hose test. Have a helper sit inside while you run water over the light area. If it drips in, you've found your source.
- Read the stain pattern. Leaks here typically stain the center-rear headliner, radiating outward from the mounting point.
- Check the rear pillars. Water often runs down the inside of the D-pillars before pooling behind the rear seats.
- Trust your nose. A musty odor that intensifies in the rain or with the heater on means moisture has been sitting long enough to support mold.
Use low pressure on the hose test
Skip the pressure washer. High pressure can force water through a seal that would hold up fine in normal rain, giving you a false positive — and potentially making an existing leak worse.
⚠️ A musty smell means the clock is already running
The EPA notes that mold can begin colonizing wet, porous materials within 24 to 48 hours. In a sealed cab that recirculates air directly onto passengers, that's not just an odor problem — it's an air-quality one. Here's why car mold deserves to be taken seriously.
How to Fix a Leaking Third Brake Light: Step by Step
For most truck owners this is a DIY-friendly repair — basic hand tools, a replacement gasket (or automotive sealant), and about an hour.
What to Do If Water Has Already Gotten In
Fixing the leak is only half the battle. If moisture has been entering for weeks or months, you may already have active growth inside the headliner foam, the rear-pillar padding, or under the carpet — and that's not a cosmetic issue. In an enclosed cab, spores recirculate through the HVAC and onto everyone inside. Here's what real remediation involves:
- Dry it out first. Pull standing water with a wet/dry vac, then run a desiccant dehumidifier in the cab for 24–48 hours to knock down active moisture before any treatment.
- Remove what can't be saved. Surface treatments don't reach spores embedded deep in porous material. Heavily contaminated headliner foam and carpet padding usually must be removed and replaced.
- Treat and purge. We follow physical removal with chlorine-dioxide gas treatment and a professional ventilation-system purge, since the HVAC is a primary spore reservoir.
- Kill the odor at the source. Musty smells come from MVOCs released during active mold metabolism — which is exactly why you can't just spray the smell away.
REALITY: the popular “ozone bomb” shortcut is the wrong tool for a vehicle — ozone reacts with and degrades the rubber door and trunk seals that keep water out, trading one leak path for another. That's why we use chlorine-dioxide gas instead of ozone. And no odor treatment of any kind works until the leak itself is permanently fixed — otherwise you're mopping the floor with the faucet still running.
If the damage is extensive or you're not sure how far it has spread, professional remediation is the right call. Car Mold Guys doesn't dabble in this — vehicle mold remediation is all we do, aligned to the ANSI/IICRC S520 standard, backed by a 90-day warranty, and 100% mobile across GA, SC, NC, TN, FL, and AL. Our car mold removal FAQ covers the questions we hear most.
Preventing Future Third Brake Light Leaks
Once it's fixed, a little maintenance keeps it that way:
- Inspect the gasket annually, ideally before rainy season. Press gently on the housing — a solid seal won't flex or move.
- Avoid high-pressure washing aimed straight at the light. Automatic washes are usually fine; pressure wands at the top of the cab can overwhelm even a good seal.
- Check after extreme weather. Heat cycles and freeze-thaw swings age gaskets faster than anything else.
- Consider an aftermarket upgrade. Several kits offer thicker, more durable seals than OEM — worth it on a truck you plan to keep. And while you're at it, scan for other common leak points like the sunroof drains and rear-window seal.
The Bottom Line
A leaking third brake light hides in plain sight — easy to miss until the damage is done. Stained headliners, moldy carpet, and musty odors don't appear overnight, but they compound fast once moisture finds its way in. The fix is usually cheap and straightforward. The cost of ignoring it is not. If something smells off in your truck, check the third brake light, seal it properly, and if mold is already a concern, bring in a specialist.
Smelling Mold After a Truck Leak? We'll Take It From Here.
As the country's only specialists dedicated entirely to vehicle mold remediation, we confirm the source, remove the contamination, purge the ventilation system, and verify the air you breathe — backed by a 90-day warranty and 100% mobile service across GA, SC, NC, TN, FL, and AL.
Sources: NHTSA Vehicle Safety Standards · EPA Mold Course · RockAuto · Permatex Clear RTV