How We Professionally Purge Your Car's Entire Ventilation System
If you've ever climbed into your car and been hit by a musty, mildewy smell the moment you flip on the A/C, you already know the problem. That smell isn't coming from your seats. It isn't coming from your floor mats. It's coming from deep inside your car's ventilation system — and no amount of air freshener is going to fix it.
At Car Mold Guys, one of the most critical and most overlooked parts of vehicle mold remediation is purging the ventilation system end to end: the ducting, the dash vents, the evaporator coil, the cabin filter compartment, and every hidden channel in between. Here's exactly how we do it, why each step matters, and why the process delivers results a can from the auto parts store never will.
Why Your Ventilation System Is a Mold Magnet
Your vehicle's HVAC system is designed to move air — but it's also, unavoidably, designed to collect moisture. Every time you run the air conditioner, condensation forms on the evaporator coil, drips into a pan, and exits through a drain tube. When that drain runs slow or clogs — or when humidity is simply high, as it is across the Southeast all summer — standing moisture inside the system creates ideal conditions for mold to colonize.
Add organic debris (pollen, dust, dead insects, leaves) and microbial growth doesn't just survive in your ductwork — it thrives. According to the U.S. Environmental Protection Agency, mold can begin growing within 24 to 48 hours of moisture exposure. Your HVAC system hands it that opportunity again every time you park.
The evaporator coil is the heart of the problem
The coil is the single most contaminated component in most vehicles — permanently damp, buried behind the dash, and impossible to reach with a brush or a spray bottle. Leave it untreated and it keeps re-seeding the entire system with mold after any surface-level cleaning. Meanwhile, the microbial VOCs from those active colonies get blown straight into the cabin every time the fan runs. That's what you're smelling. That's what you're breathing.
The Professional Ventilation Purge: A Three-Phase Approach
There's no single magic product that solves this. Professional remediation is a process, not a spray — and it takes all three phases working together.
Remediation fogging. We introduce a professional-grade chlorine-dioxide-based treatment throughout the system with a fogging machine — fundamentally different from the fragrance "bombs" sold at auto parts stores.
We set the HVAC to recirculation at max fan speed and introduce the fog through the cabin filter intake, so the system pulls the agent through every channel it would normally push conditioned air through — reaching the duct walls, the plenum chamber behind the dash, and the evaporator coil fins that no brush or spray ever touches. The treatment dwells, makes contact with the biofilm and mold colonies, and breaks down the contamination at the source.
Compressed air purge. After proper dwell time, we move to a regulated high-pressure air purge of all accessible ducting and vent openings — the mechanical disruption phase.
Working methodically through every vent (driver, passenger, rear, and floor), we dislodge the loosened debris and organic buildup and drive it out of the ducting where it can be captured. This step takes care: blowing air carelessly can push contamination deeper into the plenum or into the blower motor housing, so our technicians always work directionally, toward accessible exits. We purge the cabin filter compartment at this stage too — a housing that routinely holds compacted debris a new filter alone won't fix.
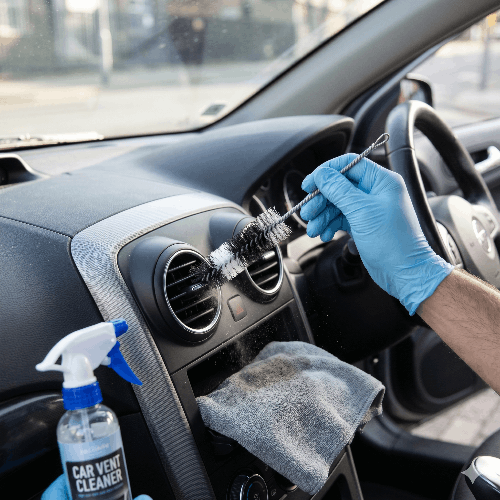
Brush agitation. The final mechanical phase uses long-handled detail brushes sized for duct openings and vent louvers — addressing what fog and air can't fully lift on their own.
Stiff bristles handle the duct interior walls; softer brushes work the louver vanes, which are notorious for collecting a thick layer of dust and mold debris on their forward-facing edges — the exact material that blows back at you the moment the fan comes on. Brushing is followed by vacuum extraction, then a second, lighter fogging pass to recoat every newly exposed surface, so nothing dislodged has a chance to re-establish.
⚠️ What the shortcuts actually do
Aerosol "bombs" release a burst of fragrance and minimal active ingredient — they treat the surfaces air touches on the way out, not the source. Ozone machines are worse than useless here: ozone is a surface deodorizer that doesn't penetrate the biofilm inside your ductwork, and it degrades the rubber seals keeping water out of your car in the first place. Both approaches mask the smell for a few weeks, which is precisely why it always comes back.
The Cabin Air Filter: Don't Skip This Step
A contaminated cabin air filter doesn't just fail to protect you — it actively makes things worse. A filter loaded with spores and organic material becomes a continuous source of contamination, re-inoculating the system every time air passes through it.
We replace the cabin air filter as part of every full ventilation remediation, and we treat the housing itself rather than just dropping a new filter into a dirty compartment. Our standard is a MERV 13-grade filter — a meaningful step up in particle capture from the factory filter most vehicles ship with, and the right balance of filtration and airflow for an automotive HVAC system.
Why Professional Remediation Beats DIY Every Time
We understand the appeal of a $15 can. Here's the honest breakdown of why those products consistently fail:
Penetration depth. Aerosol cans can't reach the evaporator coil, the plenum, or the interior duct walls — the places the contamination actually lives.
Active ingredient concentration. Consumer products are formulated for shelf safety at the expense of efficacy, and rarely dwell long enough to do more than suppress.
Mechanical disruption. No product alone removes an established colony. Brushing, air purging, and extraction are irreplaceable — a fog without mechanical removal just coats the problem.
Diagnosis. A remediation technician finds the contributing cause — a clogged drain, a failing seal, a water leak — that will bring the mold right back if it's left unaddressed.
Our processes are aligned to the ANSI/IICRC S520 standard for professional mold remediation — the same benchmark applied to water-damaged buildings. That's the difference between a specialist and a detailer with a fogger.
What to Expect After a Full Ventilation Purge
Most customers notice the difference immediately — the musty smell that greeted them every single start-up simply isn't there anymore.
Debris buildup in the ductwork and on the evaporator coil restricts airflow over time. Clearing it out frequently restores vent pressure people had stopped noticing they'd lost.
Any faint residual treatment smell dissipates within 24 to 48 hours. We recommend cracking the windows for the first day and running the HVAC on fresh-air mode — not recirculation — to help the system flush fully.
For vehicles with heavy contamination or ongoing moisture intrusion, we may recommend a follow-up at 30 days — and if a leak was the root cause, repairing it is what keeps the result permanent.
A ventilation purge is rarely the whole job on its own. When mold has reached the carpet or seats, the contaminated padding has to come out too — and our FAQ covers what a complete remediation involves.
Ready to Breathe Clean Air in Your Car Again?
The specialists at Car Mold Guys purge your entire ventilation system — remediation fogging, compressed air, and brush agitation — then install a fresh MERV 13 filter and verify the result. We bring the equipment to you, backed by a 90-day warranty across GA, SC, NC, TN, FL, and AL.
Sources: EPA — Learn About Mold · ANSI/IICRC S520